Designing an effective help system for a Windows program is one of the more neglected tasks of the design phase. Many 'home-grown' programs may use a few pop-up message boxes, but the majority of programmers seem to consider the help option as an opportunity to display a copyright message in an 'about' box. This article is not a complete reference work on the help compiler, but gives you sufficient information to produce your first 'proper' help system, and demonstrates how help is initiated from both a simple C++ and an OWL program.
The help compiler supplied with Borland/Turbo C++ is in fact a Microsoft product, and there are some differences between the versions shipped with BC/TCW 3.0 and 3.1. The differences between versions are concerned with CD-ROM optimisations, hot-spot and multiple resolution bitmaps, secondary help windows and macros. (These are not covered in this article).
The help files (.HUP) are executed by the program WINHELP.EXE (distributed both with MS Windows and BC++) usually from the [Help][lndex] or [Help][Contents] menu option. It is also possible to set up a context-sensitive help system (perhaps a good article for someone else to write).
So what are the main components we need to produce? Firstly, one or more Rich Text Format (.RTF) files. It is possible to produce .RTF files with a either a simple text editor, or a Windows word-processor that supports RTF (such as Word for Windows, Wordstar for Windows, WordPerfect for Windows etc.). The .RTF file(s) contain all the textual and formatting information for the help system.
Secondly a Help Project (.HPJ) file must be written. This is, in its simplest form, a 2-line file containing a section header and the .RTF filename; in practice, it is normally between 5 and 50 lines, depending on the number of compilation units and bitmap files used.
The Help Project file is then compiled with the command:
HC helpproj.hpj
This produces a Windows Help file (.HLP). This file can then be accessed by running up WINHELP or by double-clicking on it from the File Manager. It can also be accessed from a Windows program.
What to put in the Help file
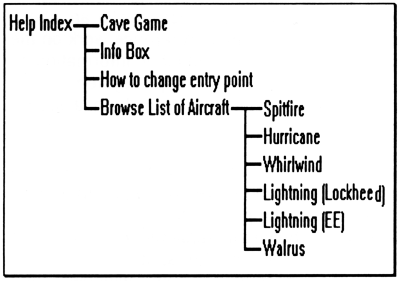
As always, the early stages of the design of any system are of critical importance, and a help system that evolves is generally of little use as it will require tortuous routes to wrest the information required from the system. (See the 'cave game' in my help demonstration).
A summary of design concepts of the help system can be found in the Borland Manual entitled Tools and Utilities Guide' page 104. For the purposes of this article, I have devised a fairly simple help structure as follows:
The Help Project File
Let us start by defining the Help Project file (DEMO.HPJ). This file can be maintained with a conventional editor, and has nothing to do with Borland's IDE project facility. Its purpose is similar to that of an IDE project file, to define all the components of the help system and define any special construction or constraints that are to be applied to it.
The file DEMO.HPJ defined below is the practical minimum that is needed for the demonstration:
[OPTIONS]
TITLE=Overload Helps Out
COMPRESS=TRUE ; forces compression of the .hip file
[FILES]
OVERLOAD.RTF ; The main text file
; semicolon is comment
[CONFIG]
BrowseButtons(); enables the « and » buttons
Most of the file's functionality speaks for itself. The text enclosed in [] are referred to as sections. There are several different sections:
OPTIONS - Build Options
ALIAS - Context String Aliases
BAGGAGE - Internal files for CD-ROM (3.1 only)
BITMAPS - Bitmap references
BUILDTAGS - Topic Build Tags
CONFIG - Initial Macro Executions (3.1 only)
FILES - Topic Files
MAP - Map Context Strings to Numerical Values used in C++ programs
WINDOWS - Secondary Help Windows
Many of these sections are not required in simple help systems.
The Topic File
The topic file is the correct name for the Rich Text Format file. RTF is a descriptive language using 'textual escape code sequences', thus enabling characteristics of the document, such as font type and size, to be adequately described. All RTF sequences and text are embedded in curly brace blocks, in a similar manner to C++ blocks. The whole of an RTF file must be enclosed in braces, and codes within a pair of braces are effective only for the duration of the block, unless subsequently overridden. There are also a series of command words, each beginning with a backslash (\) which are used to control the formatting of the text. The help system relies heavily on the footnote feature of RTF to hold its mapping and naming information.
The line numbering nnn. is not part of the file, but is there only for reference purposes.
001. {\rtf1\ansi {\fonttbi{\f0\fmodern Courier;}}
002. \f0 \fs28{
003. #{\footnote MainScreen}
004. ${\footnote Initial index}
005. {\fs40 \qc \b Demonstration of Basic Help System}
006. \par
007. \ql
008.    {\uldb Play a Simple Cave Game}{\v Start} \par
009.    {\ul Example of a pop-up box}{\v FreeBox} \par
010.      {\uldb How to change the initial Screen}{\v
InitIndex} \par
011.      {\uldb Enter Browse  Sequence Aircraft}{\v
Browse_1_010} \par
012. \page
013. #{\footnote Browse_1_010}
014. ${\footnote Supermarine Spitfire}
015. K{\footnote Spitfire; Supermarine; Fighter; British;
WW2}
016. +{\footnote planes:010}
017. {\fs40 Supermarine Spitfire} \par
018. British fighter - WW2 \par
019. \page
020. #{\footnote FreeBox}
021. {\fs80 This} is a free standing pop-up box. \par
022. It can be used for explaining technical words, \par
023. \page
024. #{\footnote Initlndex}
025. ${\footnote How to Change initial index}
026. {\fs40 How to Change Entry to Help} \par
027. An entry of the keyword !NDEX=Initindex
........other text........
028.}
029.}
An extract from the Topic file OVERLOAD.RTF
001.
This line contains a
lot of start-up information. The first curly brace is the start of
file. The '\rtf1' is called the RTF file signature, the '1' means
version 1, the help compiler will only work with RTF version 1. The
next sequence '\ansi' denotes the character set being used. The RTF
permitted values are '\ansi', '\mac', '\pc', '\pca' and '\windows' (for
ANSI, Apple Mac, PC OEM, PS/2 and Windows). Only the ANSI format should
be used in topic files. These two sequences
must follow one
another and be the first sequences in the RTF file. The next block sets
up the font table. In our case we set font zero (\f0) to be a modern
type font(\fmodem) and is called Courier. There are a number of font
types that may be used including '\froman', '\fswiss' and '\ftech'. If
I had wanted more font types in my help file, the table can be easily
extended by adding \f1, \f2 etc. The fonts
must be declared first and then referenced later in the topic file by
the \f number assigned to them. The font table block is then terminated.
002. This line declares that we intend to use font zero (\f0) at a size of 28 halfpoints (\fs28) (ie 14). The block started here is not terminated until line 028 and so these codes will become the default size for the whole topic file.
003. Now starts the fun. A help screen page (or message box is taken to be the text between a #{\footnote ...} (pound footnote) sequence and a '\page' sequence i.e. in this case at line 012. All the lines between the pound foot note and the page marker will appear on the same help screen. Several kinds of footnotes are used by the help system. The pound footnote gives the help page its name. In the case of this page it has the label MainScreen. If I indicate that the routing of the help screen will goto MainScreen this screen will be displayed. It therefore goes (without saying) that each of these labels must be unique. This label will not be displayed anywhere.
004. The dollar footnote is used to define a title for the page. This is optional, but if you use the history button, a topic page without a title will be marked as '>>Untitled Topic<<'. Only screens should have topics, there is little point giving titles to pop-up boxes, as these titles will not appear in the history list.
005. Note how this line is enclosed by braces, font commands set-up during this block will be undone on exit of the block. The font is first set to 20 (\fs40) and then centred (\qc) and set to bold (\b) The rest of the text forms the words that appear on the topic page.
006. The paragraph command forces a line feed, otherwise even though the rest of the text is on other lines, it will be wrapped around the current help screen size. This automatic wrapping can be switched off with a \keep command.
007. In addition to \qc for centring text, you can use \ql, \qr and \qj to left-align, right-align and justify text respectively.
008. The text 'Play a Simple Cave Game' would appear in double underline if this were within the word-processor. In a topic screen it turns the text green and is singly-underlined and is used to indicate a jump to another screen (i.e. a hyperlink). There are two parts to a hyperlink, the text to appear on the screen and the destination of jumps should that link be chosen. The text, as mentioned is set up as double-underlined (\uldb). The hyperlink target is marked in hidden text. This is denoted in RTF as \v . Thus This line reads set up the text 'Play a simple cave game' and if the use selects this hyperlink jump to the topic screen labelled 'Start' (not in this brief example) and end the line on the screen.
009. This line is similar to the previous line, but because it has been set up with only a single underline (\ul), it is taken to be a hyperlink to a pop-up box and not to a complete topic page. The target text that will appear in the pop-up box is defined in the topic abelled Freebox (lines 020-023). This kind of jump appears on the screen as green with a single broken underline.
010. This line is the same as 008, except that it will put the user in the Initlndex topic (lines 024-027) if this hyperlink is selected.
011. This line is the same as 008, except that it will put the user in the Browse_1_010 topic (lines 013-019) if this hyperlink is selected.
012. This is the end of the MainScreen Topic page.
013. This is the label for the Browse_1_010 topic.
014. This is the title for the history and Select a topic section of the search button.
015. The K footnote declares a series of keywords or phrases that represent this topic. Each phrase is separated by a semicolon, and all phrases will appear in the search list. If two or more topics share a keyword, the title is used to identify the occurrences in the lower search box. It is important to ensure that any topic with keywords defined, also has a title.
016. The plus footnote denotes a browse sequence. This allows a user to use the « and » keys (providing BrowseButtons() is declared in the Help Project File) to traverse forward and backwards through defined browse sequences. A sequence is identified by a subjectString:sequenceNumber. The help compiler then groups all topics with the same subjectString together and allows the user to go backwards or forwards through them in the order of the sequenceNumber. Because the sequenceNumbers are sorted on ASCII order (i.e. 100 comes before 20), it is best to ensure all sequenceNumbers have the same number of digits. The maximum value of any sequenceNumber is 999, and though you can use them as sequential numbers, the same raison d'etre as applies to BASIC line numbers, applies her. It is easier to insert topics into a sequence that is initially 10 units between than topics 1 unit apart.
017-027 These lines are for illustration purposes and have no new information to impart.
028. Closes the section started at line 2.
029. Closes the topic file.
So now that you should have a feel for what the RTF is all about, how do we put it all together? The answer is simple; by typing the command HC demo (providing HC.BAT is on your path). This will produce a file called DEMO.HLP which can be used under Windows by selecting [File][Run] from the program manager and typing winhelp demo.
Accessing your help file from within your Windows program is a doddle and can be accomplished with the following API call:
WinHelp(hWnd,"demo.hlp",HELP_INDEX,wParam);
This can be called whether you have a Windows C++ or an OWL application. Examples for both are on the companion disk.
There are many more things that you need to master in order to produce a really professional Help system, such as bitmaps and the macro language. I'll save these for a rainy day unless someone preempts me and writes an article about advanced uses of the Help Compiler.